Using Harmonic Geometry to Create Printable Overhangs Without Supports
A harmonic overhang uses progressively smaller layer-to-layer offsets to create FDM-printable arches and overhangs without conventional support material. Rather than treating overhangs as a simple angle limit, this approach frames them as a stability problem, where each deposited layer is shaped to remain supported by the geometry below it.
Support material is one of those persistent annoyances in FDM printing. It increases print time, wastes material, damages surface finish, and often turns a clean mechanical part into a cleanup job. Which isn't always a problem, like in cases where heavy post processing is expected anyways. But, most slicer strategies treat unsupported overhangs as a simple angle problem: stay under a certain threshold, usually around 45 degrees, and the printer can build the feature reliably.
That rule works, but it is also blunt, and varies heavily depending on selected material and printer.
A different way to think about printable overhangs is not just by angle, but by how each new layer is supported by the structure beneath it. Instead of asking, “Is this overhang angle printable?” we can ask, “Does each layer remain mechanically biased toward stability?”
That is where a harmonic-style curve becomes interesting.
The Basic Idea
The concept is to generate an arch, lip, or overhang using a harmonic progression, where each successive layer extends outward by a smaller amount than the layer before it.
In a simple stepped overhang, every layer might shift outward by the same distance. That creates a linear ramp. The printer is repeatedly asked to place the same unsupported offset, layer after layer.
With a harmonic overhang, the offset decreases as the structure grows outward. The early layers do most of the movement while the later layers settle into progressively smaller changes.
A simplified form looks like this:
x(n) = A * (1/1 + 1/2 + 1/3 + ... + 1/n)
Where:
x(n) = total horizontal offset at layer n A = scaling factor n = layer number
For layer-by-layer offsets, the simpler version is:
offset_per_layer = A / n
So the layers might look like:
Layer 1 offset = A / 1 Layer 2 offset = A / 2 Layer 3 offset = A / 3 Layer 4 offset = A / 4 ... Layer n offset = A / n
This creates a curve that initially expands quickly, then gradually relaxes. In practice, that means the overhang is not asking the printer to maintain an aggressive unsupported condition forever. The geometry naturally transitions into a more stable shape.
Why This 'Could Possibly' Print Better
FDM printing is not really building with perfect geometric layers. It is stacking hot, slightly deformable beads of plastic. Each new extrusion needs enough contact with the previous layer to stay attached, resist curling, and avoid sagging before it cools.
A conventional overhang fails when too much of the extrusion is unsupported. The bead droops, curls upward, or gets dragged by the nozzle. The usual solution is supports, more cooling, slower print speed, or shallower angles.
A harmonic overhang takes another approach: it shapes the feature so the structure becomes increasingly self-supporting as it grows.
The important part is not that the curve is “harmonic” in a mathematically pure sense. The important part is the decreasing layer-to-layer offset. Each layer is still advancing outward, but with less risk than the previous one. The structure gradually moves from a cantilever-like condition toward an arch-like condition.
That makes the geometry feel like it “wants” to be stable.
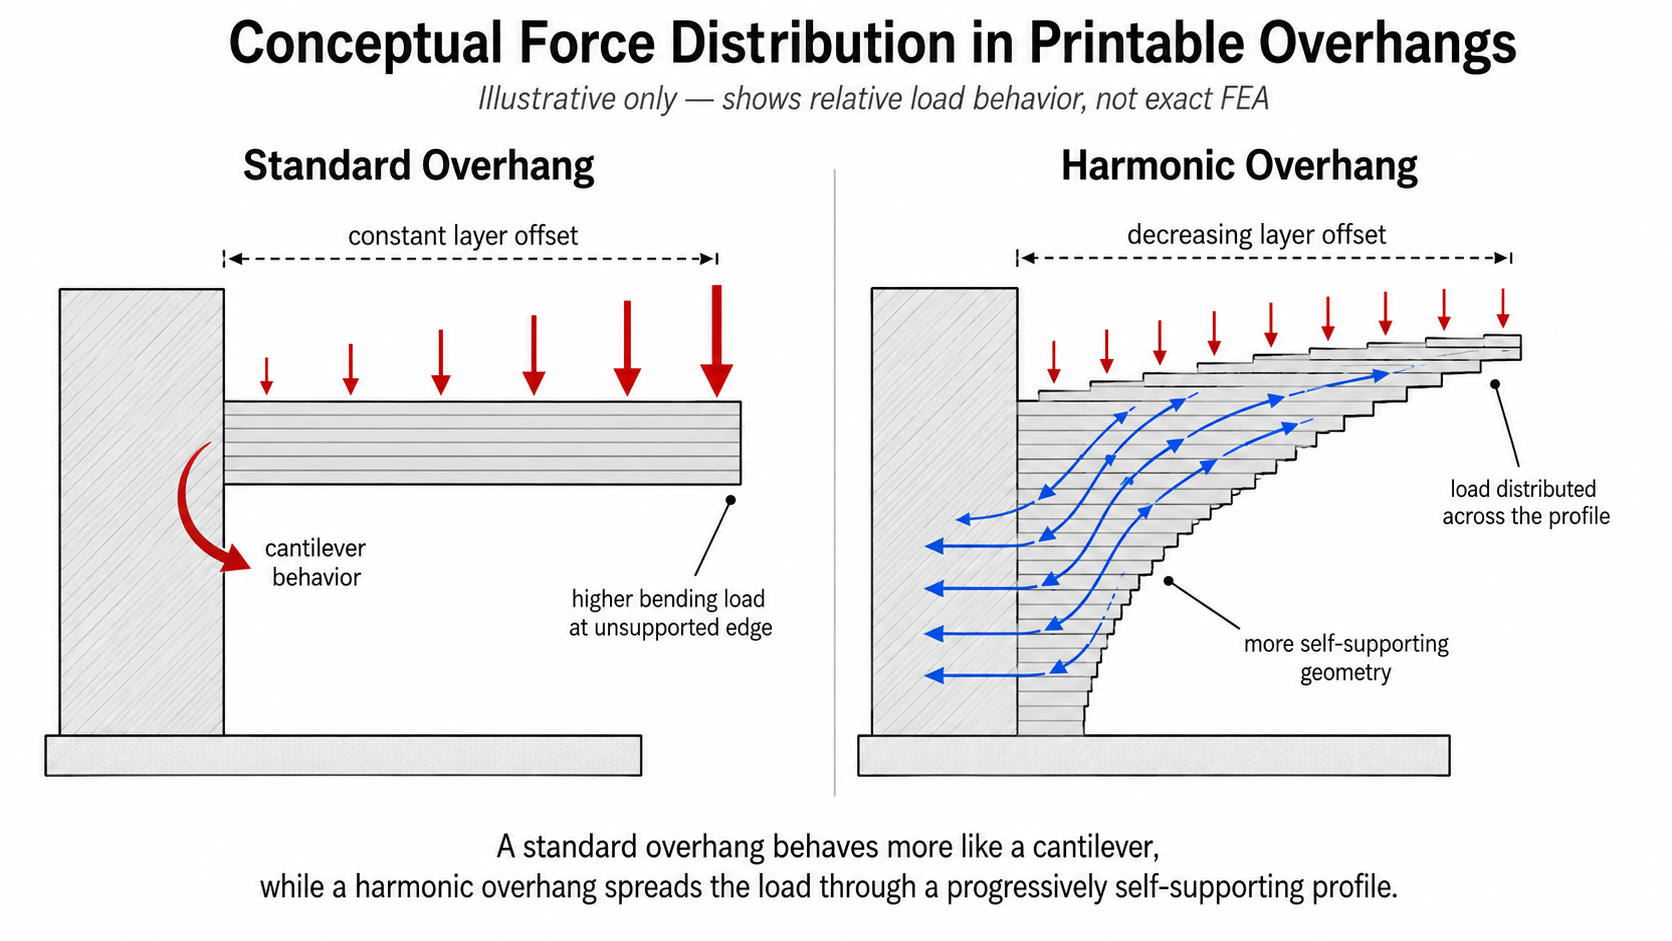
Arch Behavior Versus Cantilever Behavior
A flat overhang behaves like a cantilever. Material is pushed outward into space, and the farther it extends, the more dependent it becomes on stiffness, cooling, bead adhesion, and luck.
An arch behaves differently. It redirects load through compression and geometry. Even in printed plastic, where the material and layer bonds are far from ideal masonry behavior, the shape still matters. A curved or progressive overhang can keep more of the printed path tied back into already-solid material.
The harmonic profile is useful because it approximates a natural transition between these two conditions. The early layers create clearance, while the later layers reduce the unsupported advance. Instead of building a ledge all at once, the print grows into the overhang.
Practical Interpretation for 3D Printing
In slicer terms, the useful variable is the per-layer horizontal offset.
For a given layer height, nozzle size, extrusion width, cooling performance, and material, there is some maximum offset that will print cleanly. A harmonic profile can be designed so that the most aggressive offsets happen early, where the feature is still close to the base structure, and the remaining offsets become progressively safer.
For example, rather than designing an overhang that moves outward by 0.30 mm every layer, the profile might move something like:
Layer 1: 0.30 mm Layer 2: 0.15 mm Layer 3: 0.10 mm Layer 4: 0.075 mm Layer 5: 0.060 mm ...
The total overhang still grows, but the risk per layer decreases.
This can be especially useful for features like:
rounded lips cable pass-through openings printed brackets duct transitions self-supporting arches snap-fit lead-ins internal channels cosmetic chamfers supportless underside curves
The goal is not to eliminate support material from every possible geometry. The goal is to design overhangs that are inherently easier for the printer to produce.
Why This Is Different From a Normal Chamfer
A normal chamfer is linear. Every layer moves outward by the same amount. That makes it predictable, easy to model, and easy for slicers to handle.
A harmonic overhang is nonlinear. It changes most aggressively near the beginning and then tapers off. This gives the designer more control over where the difficult part of the print happens.
A chamfer says:
Move outward at a constant rate.
A harmonic overhang says:
Move outward quickly at first, then reduce the offset as the structure extends.
That difference matters because printability is not only about the final angle. It is about the local behavior of every deposited bead.
Experimental Results and Observations
This is still a theoretical design method that needs thorough testing, but early experiments suggest that the idea has 'some' practical value. Harmonic-style overhangs can print cleaner than equivalent unsupported ledges, especially when the curve is tuned to the printer and material.
'If you're interested in trying harmonic overhangs in your prints, check back soon! we have a custom slicer currently in development that applies this principle on the fly!'
The biggest improvement appears to come from avoiding a long sequence of identical marginal overhangs. With a linear overhang, if the printer is near its limit, every layer continues to operate near that limit. With a harmonic profile, the print may only experience the most aggressive condition briefly before transitioning into safer geometry.
That does not mean the method is universal. It still depends heavily on:
layer height line width material stiffness part cooling extrusion temperature print speed nozzle diameter wall count slicer path planning orientation of the feature
Materials like PLA and PETG may tolerate these shapes differently. Filled nylons, carbon-fiber blends, and engineering polymers may behave better in some ways because of stiffness, but worse in others because of cooling behavior, shrinkage, or layer adhesion requirements.
Design Guidelines
A practical harmonic overhang should be constrained, not simply generated mathematically and trusted blindly.
A good design workflow would be:
- Choose the desired total overhang distance.
- Choose the available vertical height.
- Define the number of layers involved.
- Pick a maximum allowable first-layer offset.
- Generate decreasing offsets using a harmonic or harmonic-inspired curve.
- Verify that no layer exceeds the printer’s known overhang capability.
- Test with a small coupon before using it in a functional part.
The harmonic curve should be treated as a design tool, not a magic rule. The printer still has physical limits. The benefit comes from distributing the overhang in a way that respects those limits.
Where This Could Be Useful
This technique is most interesting for parts where support removal is difficult or unacceptable.
Internal cavities are a good example. If a part has a duct, tunnel, recess, or enclosed channel, support material may be impossible to remove cleanly. A harmonic overhang can provide a way to close the geometry gradually while keeping the internal surface printable.
It may also be useful for production-oriented printed parts. When printing one prototype, removing supports is annoying. When printing dozens or hundreds of parts, support removal becomes a manufacturing cost. A geometry-driven supportless design can reduce post-processing and improve repeatability.
For functional parts, this also has the advantage of keeping fibers, walls, and perimeters continuous. Support interfaces often create rough surfaces and weak cosmetic regions. A self-supporting profile can preserve cleaner toolpaths and better exterior quality.
Limitations
This idea should not be oversold. A harmonic overhang is not a replacement for all supports.
It will not solve large flat ceilings. It will not make poor cooling irrelevant. It will not overcome bad material tuning. It also may not behave the same across slicers, because perimeter generation and extrusion ordering can change the real printed result.
There is also a modeling concern. A mathematically smooth curve may be converted into tiny faceted segments depending on CAD export settings. If the mesh is too coarse, the intended gradual transition may become a rough stair-step. If the mesh is too fine, the slicer may still simplify or process it in unexpected ways.
The best results will likely come from generating the profile intentionally, with layer height and extrusion width in mind.
TL:DR
A harmonic series can be used as a design strategy for printable overhangs by reducing the layer-to-layer offset as the feature grows. Instead of treating overhangs as a fixed-angle problem, this approach treats them as a stability problem across successive layers.
The result is a structure that behaves less like a flat cantilever and more like a self-supporting arch.
This is still an experimental idea, but it points toward a useful broader principle: supportless printing is not only a slicer problem. It is also a geometry problem. By designing parts that cooperate with the way FDM printers actually build material, it is possible to create features that print cleaner, use less support, and require less post-processing.
The harmonic overhang is one example of that mindset: let the structure become printable by design.